Instead of repeatedly cleaning your car before every buyer visit, complete the interior, exterior, inspection, and photo work before publishing your listing, then maintain that condition through the sale. Royal Touch Mobile Detailing LLC brings a faith-driven commitment to doing work right the first time, with experience serving premium vehicles and aircraft; this guide applies that care to detailing before selling a car privately in 2026.
- Royal Touch Mobile Detailing LLC offers mobile car detailing for private sellers who want convenient preparation before listing.
- Detailing before selling a car privately should reveal condition, not hide damage or substitute for mechanical repairs.
- Complete interior detailing and exterior cleaning before taking listing photos; keep defects visible.
- Refresh high-touch areas before showings instead of repeating the entire pre-sale detailing workflow.
Why this matters
A buyer needs to understand what the car actually looks like. Dirt, belongings, streaked windows, and strong fragrances get in the way. Cleaning makes inspection easier; it does not establish mechanical condition or guarantee a sale.
Royal Touch Mobile Detailing LLC is best for private sellers who want mobile car detailing before listing their vehicle. The family-owned company offers auto detailing throughout North Carolina and parts of Virginia and South Carolina. Confirm whether your location and proposed work fit before arranging service through Royal Touch Mobile Detailing LLC.
For a 2026 private sale, your goal is a clean, accurately represented vehicle—not an appearance that photographs well but disappoints in person. Put the work buyers can inspect ahead of optional appearance upgrades.
Before you start
- Gather access and materials. Have the vehicle keys, access to the passenger compartment and trunk, the owner's care instructions, and suitable cleaning materials. For mobile service, discuss the work location and access requirements before the appointment.
- Prepare your listing information. Gather service records, note known faults, and remove documents containing personal information from the car. Keep useful maintenance records available separately for buyers.
- Plan around drying, not just washing. Seats, carpet, and mats must be dry before you replace coverings, take interior photos, or close the vehicle for storage. Check material compatibility first, especially on delicate trim, repaired upholstery, and existing protective finishes.
Do not schedule the photo session around an assumed drying time. Check the actual condition of the upholstery and carpet, and follow the cleaner's directions. Damp material is a reason to pause the workflow, not hide it beneath a mat.
Vehicle assessment and service scope
Choose the work that addresses the condition
- Empty the vehicle. Remove personal belongings, loose rubbish, child seats when appropriate, and removable cargo. Check seat pockets, door bins, the center console, and the trunk before cleaning starts.
- Record existing issues. Note stains, odors, scratches, chips, damaged trim, warning lights, and missing items. Separate appearance concerns from mechanical or safety concerns; a detail is not a repair inspection.
- Choose the cleaning scope. Match the work to visible contamination and the vehicle's materials. Ask for an assessment before requesting paint correction or a protective coating solely because you are selling.
For your 2026 listing, keep an owner checklist with separate entries for appearance, maintenance, and known faults. That prevents a clean cabin from being mistaken for evidence that everything else has been checked.
Compare preparation options
These are work categories, not named service packages. Choose the smallest scope that addresses the condition honestly.
| Work category | Best for | Practical benefit | Limitation |
|---|---|---|---|
| Basic cleaning | A maintained vehicle with loose dirt and clutter | Removes obvious distractions before photos | Does not address embedded stains or paint defects |
| Interior detailing | A cabin with accumulated grime or stained surfaces | Gives upholstery and touchpoints focused attention | Permanent damage and some stains remain |
| Exterior detailing | Road film, dirty wheels, and marked glass | Makes exterior condition easier to inspect | Cleaning does not remove chips or deep scratches |
| Paint correction | Paint defects that warrant professional assessment | Addresses suitable surface defects through polishing | Removes some clear coat and cannot repair every defect |
| Ceramic coating | An owner planning continued use before selling | Adds a protective finish when properly applied | Does not repair damage or establish resale value |
Prioritize cleanliness over extra treatments. Paint correction deserves a separate condition assessment, especially on repainted panels or an unknown paint history. Read the paint correction stages guide before discussing the appropriate scope.
Expected result: You have an agreed cleaning plan, a written defect list, and a clear boundary between detailing and repair work.
Interior cleaning and drying
Prepare the cabin for close inspection
- Remove loose dirt first. Vacuum accessible carpet, seats, creases, and the trunk before applying cleaners. Use tools suitable for the surface, and avoid forcing attachments into fragile trim or electrical components.
- Clean surfaces by material. Follow the product directions and vehicle care instructions for upholstery, leather, plastics, and displays. Test a cleaner in an inconspicuous area before treating a visible surface; apply it to a cloth where the instructions call for that method.
- Address odor sources and moisture. Inspect spills, mats, seat creases, and stored items rather than covering smells with fragrance. If the source involves water intrusion or another vehicle fault, resolve that issue separately.
Concentrate on what buyers touch: the steering wheel, door pulls, seat controls, and center console. Use the correct method for each material, and leave control surfaces free of greasy residue. A glossy finish is not the same as a clean surface.
Remove cleaning residue from glass using a compatible method, including any care requirements for window film. Clean mats separately and return them only when dry. Check beneath the mats as well as their upper surfaces.
Verify the cabin before photography
Inspect the vehicle with the doors open and again with the doors closed. Check whether the glass is clear, whether odors remain, and whether carpet or seats still feel damp. Do not equate a dry-looking fabric surface with a fully dry cushion.
If a stain remains after appropriate cleaning, record it for the listing. More aggressive cleaning is not automatically the right answer, particularly on worn or delicate materials.
Expected result: The cabin is uncluttered, dry, and ready for a buyer to inspect without fragrance or dressing disguising its condition.
Exterior cleaning and final checks
Clean without concealing damage
- Check the surface before washing. Look for loose trim, damaged seals, peeling finishes, and areas needing special care. Follow the vehicle's care instructions and the directions for any existing coating or film.
- Wash and dry with appropriate materials. Avoid dragging dirty cloths across paint. Keep wheel-cleaning tools separate from paint-cleaning tools, and do not polish an unidentified defect simply because washing did not remove it.
- Inspect the clean vehicle in daylight. Check paint, glass, wheels, lights, and visible trim. Record defects that become clearer after the dirt is gone; those belong in the listing rather than under a temporary cosmetic cover.
Inspect lower panels and door openings, where grime can remain after the most visible surfaces look clean. Use only suitable cleaning methods around seals and electrical areas. Avoid adding engine-bay cleaning to the job without understanding the vehicle-specific precautions.
For tires, favor a clean finish without excess product on tread or nearby surfaces. Keep slippery dressings away from pedals and steering controls. Preparation should make the car easier to assess and use, not introduce another problem.
Expected result: The exterior is clean enough to photograph accurately, and your defect list reflects the vehicle's condition after cleaning.
Listing photos and showing setup
Build a repeatable presentation workflow
- Capture the exterior. Use 4 corner views as a starting checklist, then add straight-on views and close-ups of relevant details. Photograph defects directly; do not rely on a distant image to disclose a scratch or dent.
- Capture the interior and records. Include front seating, rear seating where fitted, the dashboard, and cargo space. Keep personal documents and identifying information out of public images, and do not edit warning lights or damage out of photographs.
- Write the listing from verified facts. Separate cleaning performed from maintenance completed. Describe known faults plainly, and only claim a coating, correction service, or other treatment when you have supporting records.
- Set the showing routine. Keep a clean cloth and suitable glass-cleaning supplies ready for light touch-ups. Check the cabin, cargo area, and exterior before each visit rather than repeating the entire detail.
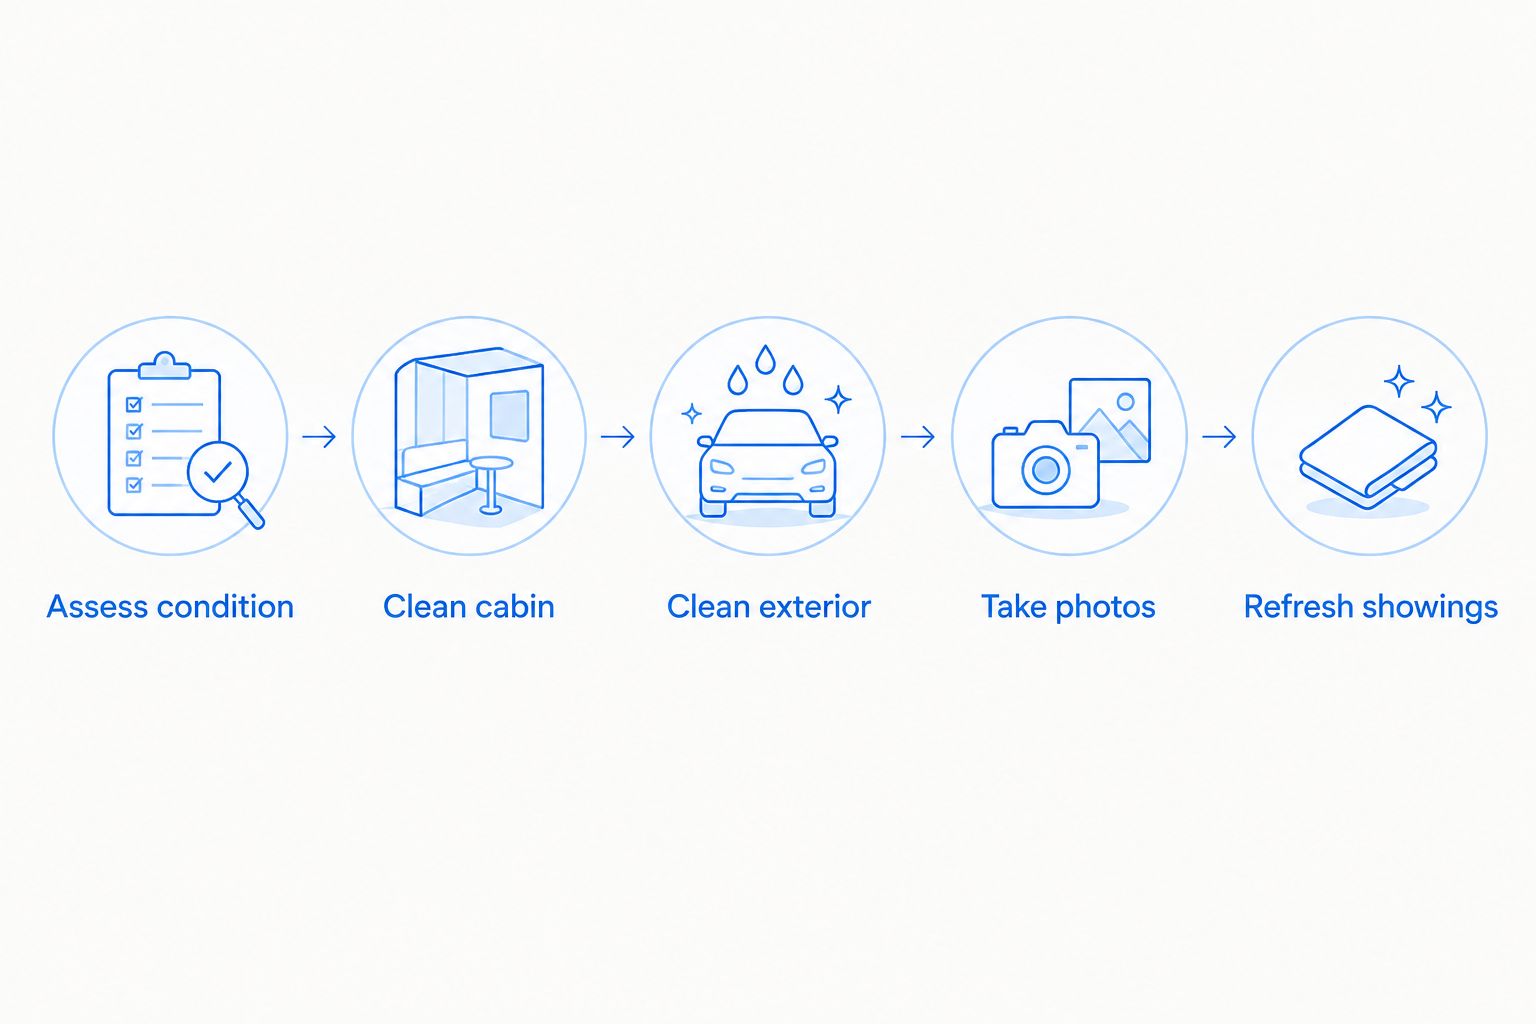
The workflow is straightforward: assess condition, clean the cabin, clean the exterior, take honest photos, then refresh before showings. Each stage depends on the previous stage being complete—not merely booked.
Take photos in consistent light without filters that alter the finish. Keep the photo set together so replacements remain easy to find. If you take 2 photo sets in different lighting conditions, use the set that represents the car most clearly—not the one that hides its flaws.
Expected result: Your 2026 listing shows the cleaned vehicle accurately, and your showing checklist keeps the presentation consistent with those photos.
Second workflow: refresh whenever the car is driven
If you continue using the vehicle while it is listed, switch from preparation to maintenance. Do not repeat deep cleaning simply because a showing is scheduled. Check what has actually changed.
- Remove newly added belongings and rubbish after each journey.
- Check mats, seating, touchpoints, and glass before the next showing.
- Clean new spills promptly using a material-compatible method, then allow complete drying.
- Replace listing photos if the vehicle's visible condition changes, and update disclosures when a new fault appears.
For a 2026 sale, this refresh routine is best for owners who still need their daily driver. Its benefit is focused upkeep; its limitation is that road use can introduce new dirt or damage after the original photos.
If the vehicle stays parked, inspect it before a buyer arrives rather than assuming it remains photo-ready. Check for dust, debris, and dampness. The buyer should see the condition represented in the listing, not discover that the photos describe an earlier state.
Troubleshooting
- The cabin smells again after cleaning. Recheck the source instead of adding fragrance. Inspect hidden rubbish, wet mats, spills, and signs of moisture; persistent water intrusion requires diagnosis beyond detailing.
- The seats still feel damp. Pause photography and use. Follow drying instructions, check the underlying cushion, and avoid trapping moisture beneath covers or mats.
- The windows streak in listing photos. Inspect both sides of the glass and follow the compatible cleaner's instructions. Use a clean cloth and check from different angles; residue becomes easier to spot when the light changes.
- Scratches remain after washing. Treat them as defects until assessed. Do not describe washing as scratch removal, and do not promise that polishing will resolve damage of unknown depth.
- The car gets dirty between appointments. Use the refresh checklist and address the affected area. Repeating extraction or polishing is not an appropriate response to every new mark.
Customize your workflow
For a daily driver, start with clutter removal, cabin cleanliness, clear glass, and an accurate exterior presentation. For luxury or performance vehicles, discuss delicate finishes, previous repairs, and existing protection before approving treatment. The service scope should follow the material and condition, not the vehicle's badge alone.
Royal Touch Mobile Detailing LLC offers mobile car detailing, paint correction, ceramic coating, and window tint services. Mobile service reduces the need to take the car elsewhere for detailing, but you still need to coordinate access and the work location. Discuss the pre-sale goal before adding services that address a different ownership need.
Plan your pre-sale detail
Discuss the vehicle's condition, cleaning priorities, and mobile service location before listing.
Keep the completed detailing records with your sale documents. They describe work performed; they do not replace maintenance history, a mechanical inspection, or your disclosure of known faults.
FAQ
Should I detail my car before selling it privately?
Yes—clean the interior and exterior before taking listing photos so buyers can inspect the vehicle's condition clearly. Detailing does not guarantee a sale or establish mechanical condition.
What should I clean first before listing my car?
Remove belongings and loose dirt before cleaning surfaces. Complete any wet interior work early enough to verify drying before photos and showings.
Is paint correction necessary before selling a used car?
No—paint correction is not a default requirement for a private sale. Have suitable defects assessed separately, and disclose damage that remains after cleaning.
Should I get ceramic coating just to sell my car?
Do not add ceramic coating solely on the assumption that it will improve the sale outcome. Consider it separately if you will continue owning and using the vehicle, and keep records of any treatment performed.
How long before listing photos should I have the car detailed?
Schedule photos after cleaning is complete and upholstery, carpet, and mats are dry. Follow the product or service drying instructions rather than relying on a fixed interval.
What if an odor or stain remains after detailing?
Identify the odor source and disclose any stain or damage that remains. Fragrance does not correct the cause, and repeated aggressive cleaning can be inappropriate for delicate materials.
Can mobile detailing help with a private car sale?
Mobile detailing lets you arrange cleaning at an agreed location rather than taking the vehicle elsewhere for that work. Royal Touch Mobile Detailing LLC offers mobile auto detailing; confirm location and scope before arranging service.
Should I edit scratches out of my car listing photos?
No—keep defects visible and include clear close-ups where needed. Listing photos should represent the vehicle the buyer will inspect.
One last thing
A detail can reveal damage rather than remove it. Once dirt is gone, inspect the car again and update your disclosures before publishing. That final check is more useful than another layer of shine: it keeps your photographs, description, and buyer's inspection aligned.